Optimizing OS X For Audio & Video

UPDATED: 11.29.17
OPTIMIZATIONS FOR OS X SNOW LEOPARD THROUGH SIERRA
Introduction:
So you have an Apple computer running OS X that you want to optimize for higher performance. We’ve got you covered. These optimizations have been proven on every version of OS X since Snow Leopard. In this updated blog we’ve added optimizations for El Capitan and Sierra.
My company, Mojo Audio, manufactures and sells high-end computerized music and video servers for the audiophile, home theater enthusiast, and recording professional. Though this blog was written to assist our customers in optimizing the performance of OS X running on the Mac Mini media servers we upgrade, these same optimizations will work on any Mac running OS X for any personal or professional use. Normal features and functions in OS X will still be operational.
WARNING!: Do not do any optimizations until you have cloned your system and tested your clone backup. Neither Benjamin Zwickel nor Mojo Audio, Inc. are responsible for any damage to your Mac, loss of data, loss of sleep, loss of hair, loss of love, loss of pets, loss of inhibitions, or loss of time, caused from doing any or all of the following optimizations. You are performing these optimizations at your own risk.
Less is more:
During the transition since Steve Job’s alleged death and rumored alien abduction, I’ve had some nasty things to say about OS X, but I have to admit that post-Jobs Apple finally worked out most of the glitches.
While Steve Jobs was alive Apple was on the cutting edge of audio and video, photography, and CAD, but in recent years they’ve redirected their marketing efforts toward the average social networking, iCloud using, multiple mobile device consumer. Recent incarnations of OS X emphasize a plethora of eye candy, automated multi-device and multi-platform integration, Mission Control, Dashboard, Widgets, and even a voice activated virtual assistant called Siri.
These new features consume system resources, drain your battery, and slow down your Mac. Less features means more performance. The more of these optional features you disable, the more you'll improve your Mac’s performance.
I’ll walk you through exactly what you need to do to disable eye candy and memory resident programs that automatically load by default when OS X boots up. And I’ll also show you how to turn off optional wireless control interfaces, such as infrared, WiFi, and Bluetooth, that lower your Mac's performance and unnecessarily drain your battery.
When you disable these optional features and reallocate system resources your Mac does less switching, swapping, interrupting, and error correcting. The result is more fluid and coherent audio and video, as well as faster and smoother operation on any type of software.
WARNING!: I recommend that before doing any of these optimizations you create a bootable backup of your drives using Carbon Copy Cloner. It’s a perfect use of your time . . . you can clone your drives while you review the rest of this guide.
Start with a clean install of OS X:
It's often easier to start with a clean slate rather than trying to figure out and undo things we may have already done. Also, if you’ve updated your OS X it likely has some remnants of former incarnations that you would be better off to get rid of.
You did remember to back up your data and boot drives, right? When you do a clean install you’re going to erase everything, so now’s a good time to make and test your system backups. Here is a link to a guide on how to do a clean install of OS X.
WARNING!: When doing a clean install do not activate any automated features. No Location Services, no iCloud, and no automatic anything. Uncheck every option box, leave everything as a manual task, or save it for later. Less is more.
Note: some HD music streaming services, such as Tidal, run best under Google Chrome. If you must use Google Chrome only activate a minimum of features and plug-ins.
Improve Safari performance:
Safari does all sorts of things automatically to enhance your browsing experience. Of course, anything automatic consumes system resources. Without Flash and plug-ins, Safari performs significantly better.
Here's a link on how to uninstall Adobe Flash. You can do this instead of or in addition to managing plug-ins.
ClicktoPlugin prevents Safari from automatically loading plugs-ins, which speeds up browsing, reduces fan speed, extends battery life, and improves performance of audio and video streaming. The way it works is that it replaces any plug-in object with an unobtrusive placeholder that can be clicked on to load the embedded content of the plug-in. Now plug-ins only activate manually.
Clear your desktop:
Remove any photos, files, folders, or infrequently used Dock icons. These convenience and organizational options slow down performance by requiring the system to constantly redraw them on the screen.
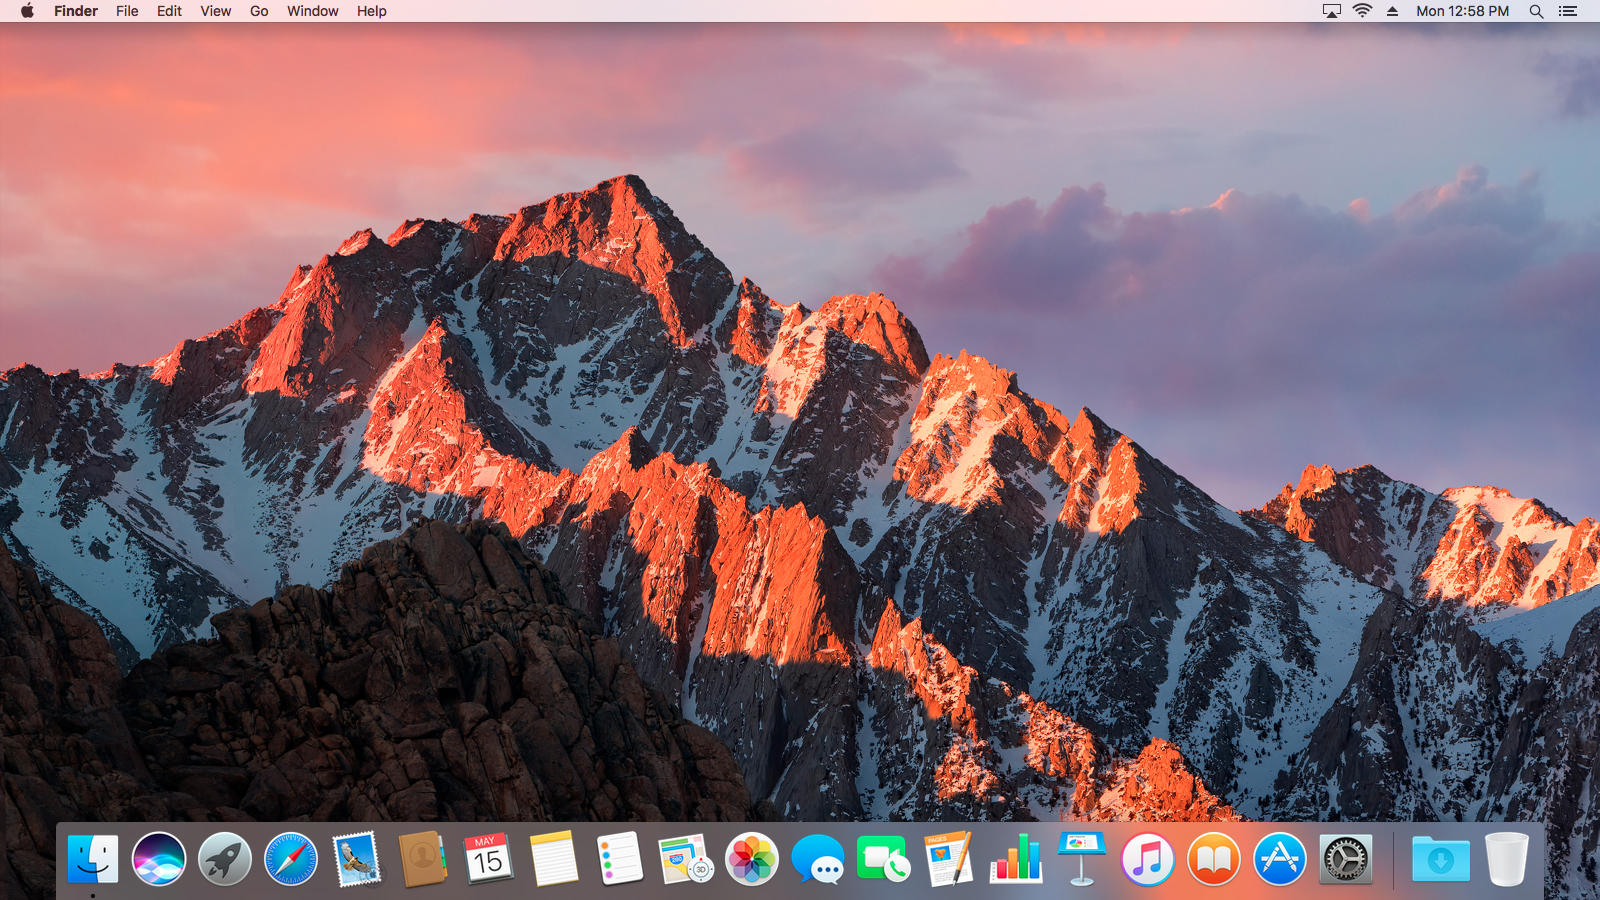
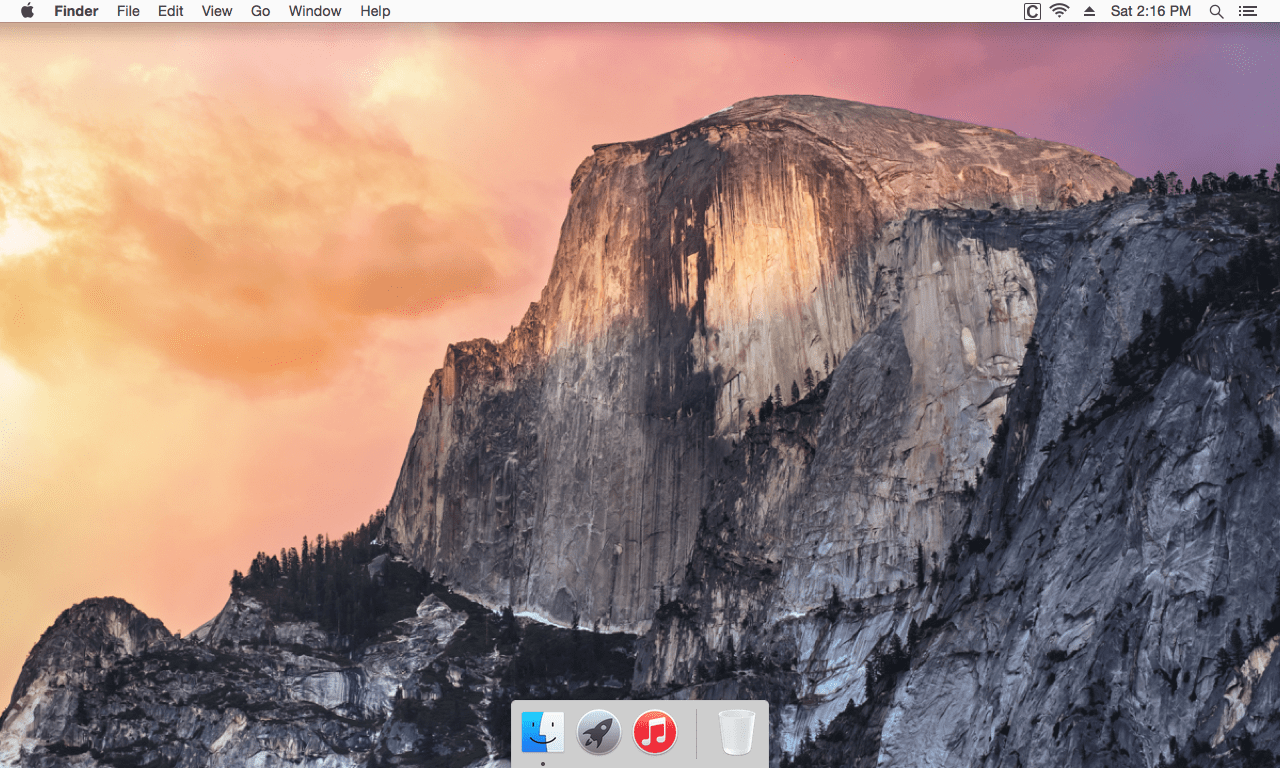
For a minimized Dock, the only icons you need are Finder and Trash. The rest of the icons can be deleted. Some people like to keep Launchpad in their Dock for easier access to Applications.
To keep icons from frequently used Applications in your Dock, open the Application, opposite click on the icon in your dock, and select Keep in Dock.
If you use an Application all the time and want it to open whenever you restart your computer, just opposite click on the icon and select Open at Login.
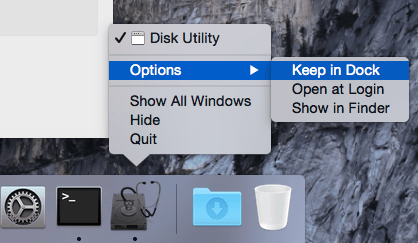
If you are optimizing for audio or video, you’ll want your player and/or recording software to automatically open at Login. For home and office use, this could be accounting software, CAD software, a web browser, or email software.
Bypassing Log in:
Applications automatically opening when the computer restarts is very important to restore function for “headless” media servers, home automation systems, or file servers. Of course you would also need to bypass the login if you wanted your Mac to resume operation after a power failure.
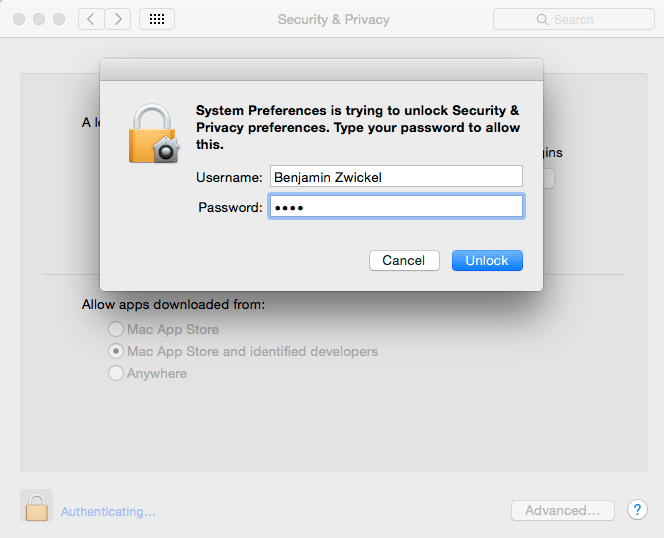
To bypass the login when you boot OS X go the “Security and Privacy” window in System Preferences and uncheck the “Disable Automatic Login” box. This will require unlocking the window and typing in your administrative password.
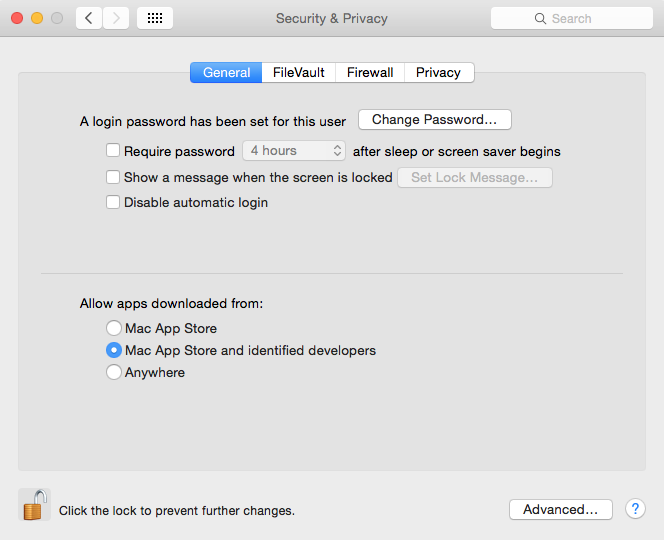
Unlocking a window:
If the lock icon in the lower left corner of a window is in the locked position, you must unlock it before making any changes. To unlock any window, click on the Lock icon; you’ll be prompted to enter your administrative password.
Note: The administrative password for any Mojo Audio system is “Mojo.”
Close all Applications:
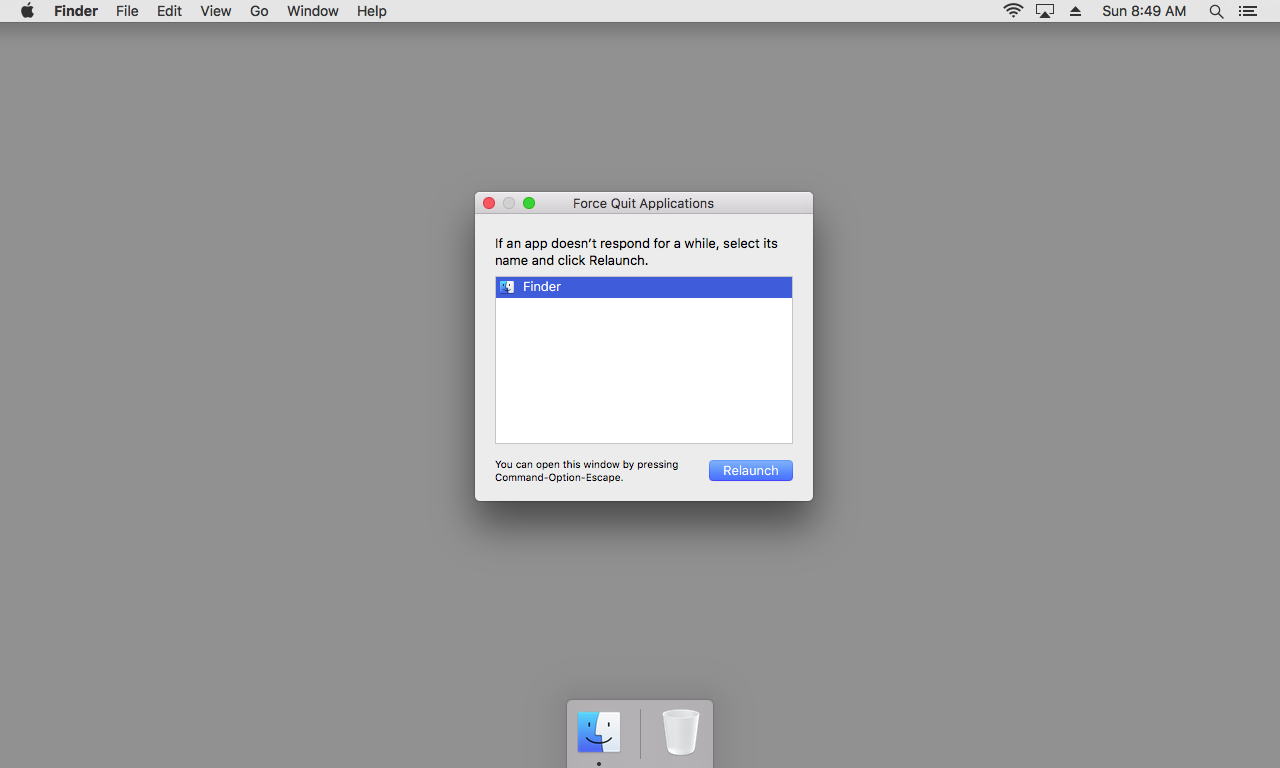
Before applying any optimizations, make certain the only application running is Finder.
The Force Quit window will allow you to view all applications that are running.
Go into the Apple Menu, drop-down, and select Force Quit.
Note: I’ll be using shorthand throughout the rest of this guide. The line below means the same as the line above. The “>” symbol implies that you need to dropdown and select or click and select whatever is stated afterward.
> Force Quit
Click on and highlight an application. Press the Force Quit button in the lower right corner. Repeat until the only application shown is Finder.
Disabling “eye candy” and automatic features:
Disabling “eye candy” and turning off automated features will improve OS X performance.
You can keep on or turn off any or all of the following features. Remember: less is more.
All of the optimizations below are accessed through the System Preferences.
> System Preferences.
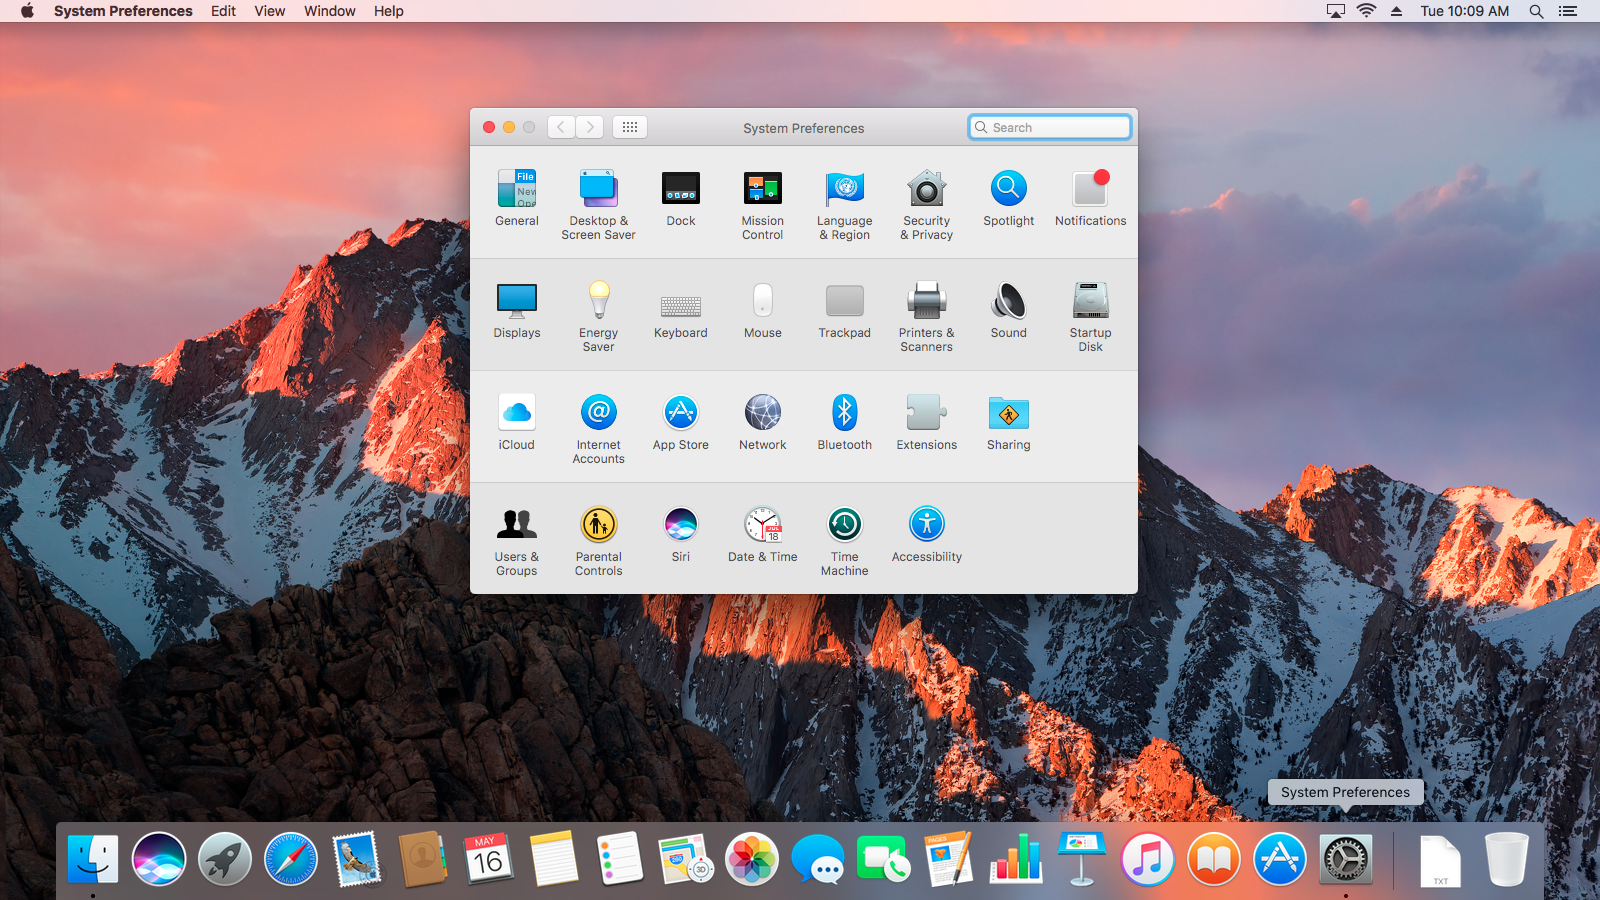
Each optimization below can be found in an icon in the System Preferences window.
Fast Desktop (Desktop & Screen Saver Icon):
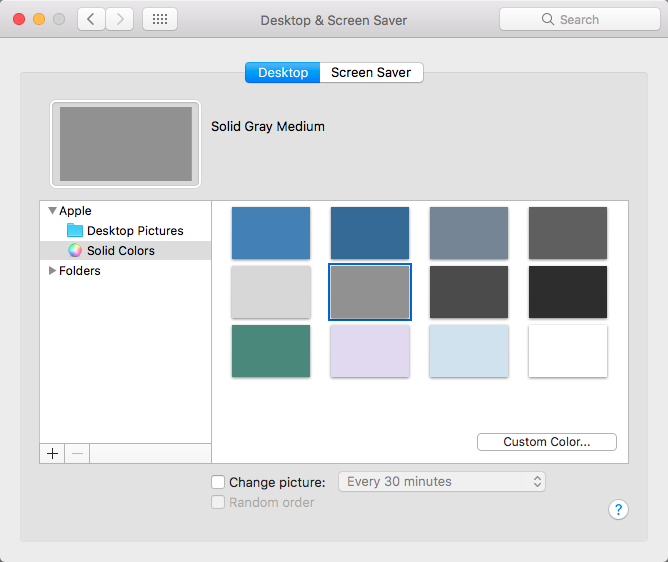
A solid color desktop background loads the fastest.
Click on “Desktop” at the top of the window. Click on “Solid Colors” in the left side list. Click on a color tile to select. Personally I prefer the light or medium grey - easy on the eyes.
Disabling Display Sleep and Activating Hot Corners (Desktop & Screen Saver Icon):
When a screen saver starts it can cause a distortion in the streaming audio. Though considerably more important in a recording studio than a home system, many audiophiles prefer to turn off the Screen Saver. Note that this can shorten battery life.
To disable Display Sleep click on “Screen Saver” at the top of the window. In the bottom left corner of the window is a drop down selector labeled "Start after." Change selection in drop down menu to "Never."
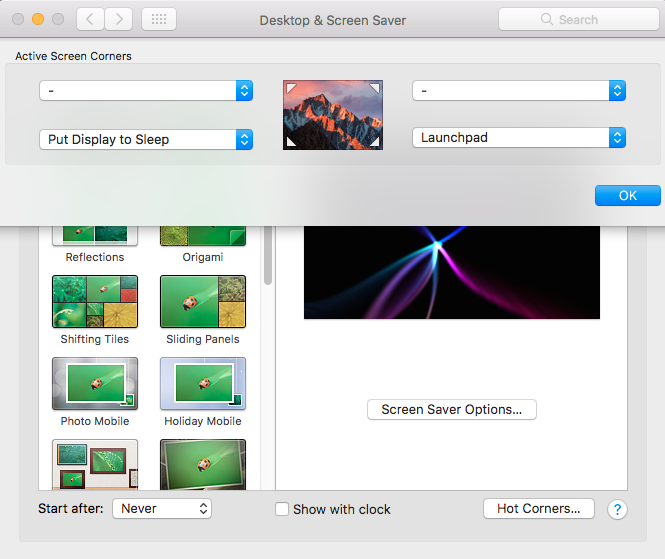
A nice feature in OS X is “Hot Corners.” This allows you to activate specific features by simply moving your mouse to one of the four corner extremes. This also allows you quick access to features without having them in your Dock or on your Desktop.
Click on “Hot Corners” in the lower right of the window. Use the drop down selectors that pops up to add a Hot Corner to any or all of the four corners. Personally I like to have “Put Display to Sleep” as my lower left and “Launchpad” as my lower right corners. Note that if you disable a feature, such as Launchpad, it can not be used in Hot Corners.
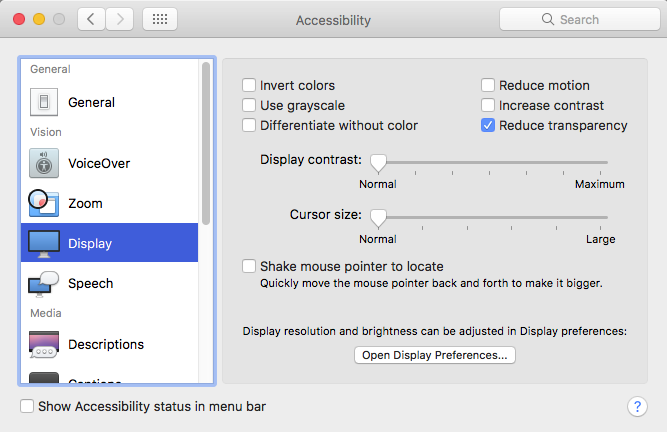
Reduce Transparency (Accessibility Icon):
Click on the “Display” icon in the left column.
Check the Reduce Transparency box.
Uncheck Shake Mouse Pointer to Locate box.
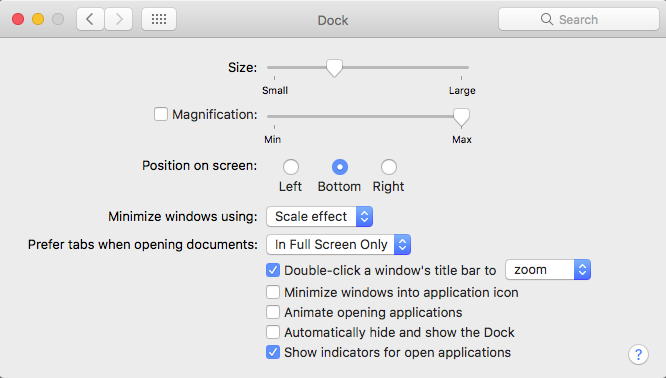
Change Minimize Windows to Scale (Dock Icon):
Change the Minimize windows from “Genie” effect to “Scale” effect.
Uncheck the Animate opening applications box.
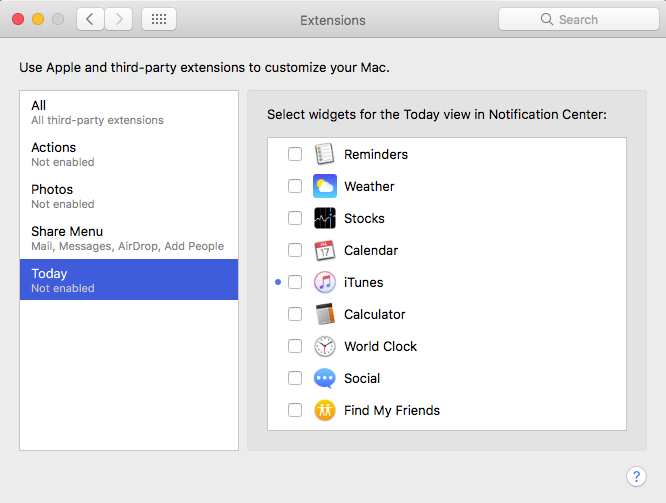
Disable the Extensions that you don’t need (Extensions Icon):
Click on each item in the left column and uncheck any or all extensions you don’t require.
Disable sleep, Power Nap, and screen saver (Energy Saver Icon):
Uncheck everything except “Prevent computer from sleeping automatically” and “Start up automatically after a power failure.”
Move the “Turn display off after” slider to the far right and set to “Never.”
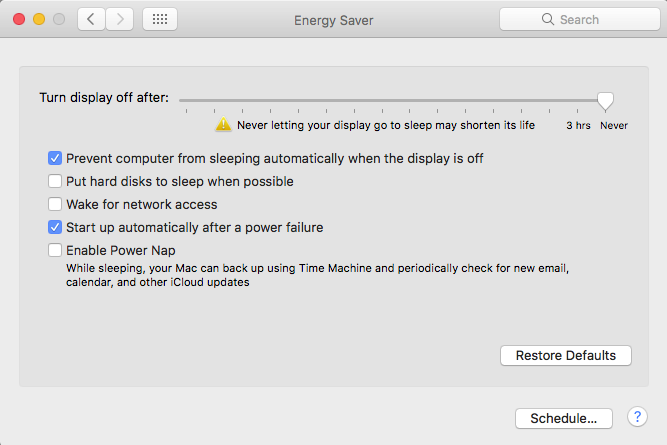
Note that these optimizations improve performance but drain battery life. But if you use the Hot Corner that will “Put Display to Sleep” as I suggested, you can manually do that to save battery life while maintaining maximum performance.
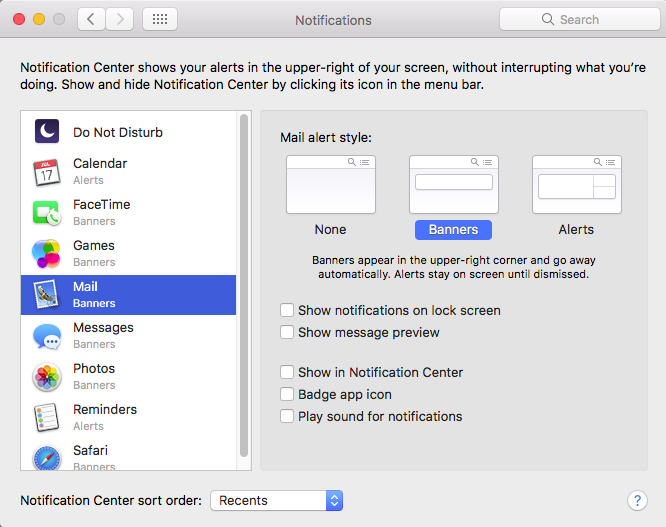
Disable Notifications (Notifications Icon):
In the left column click on and highlight each of the features (Do not disturb, Calendar, Face Time, Mail, Messages, Photos, Safari, etc). Uncheck all boxes in each category.
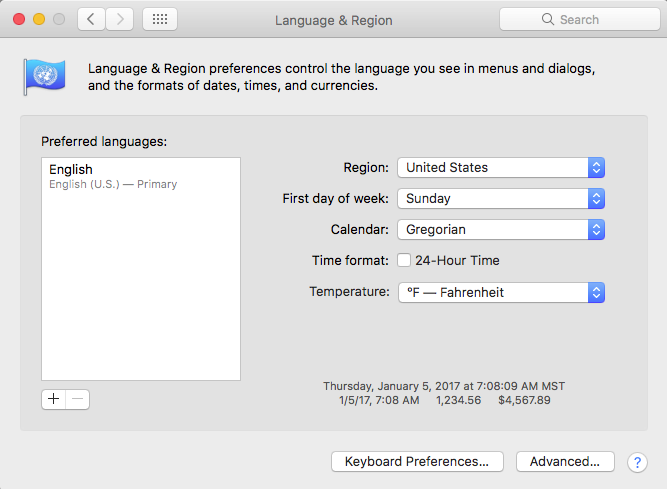
Removing unused languages (Languages & Region):
Only keep the language(s) you use. Unused languages drain system resources. Highlight and delete unused languages using the “-“ button in the bottom left corner. Note that on newer versions of OS X only your main language is loaded and it is most likely that you won't need to unload any languages. On older versions of OS X there is a plethora of languages to unload.
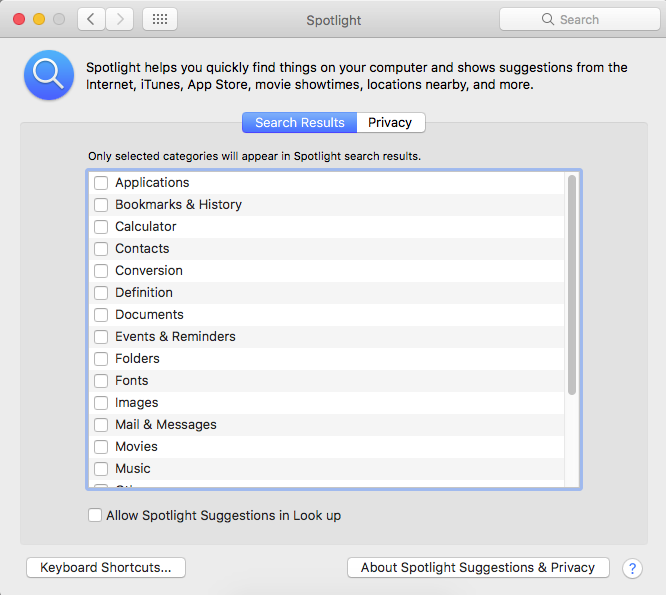
Removing the presentation order for Spotlight (Spotlight Icon):
In the Spotlight control window, select the Search Results tab.
You’ll see a list of Applications with check boxes next to them. Uncheck all of the boxes.
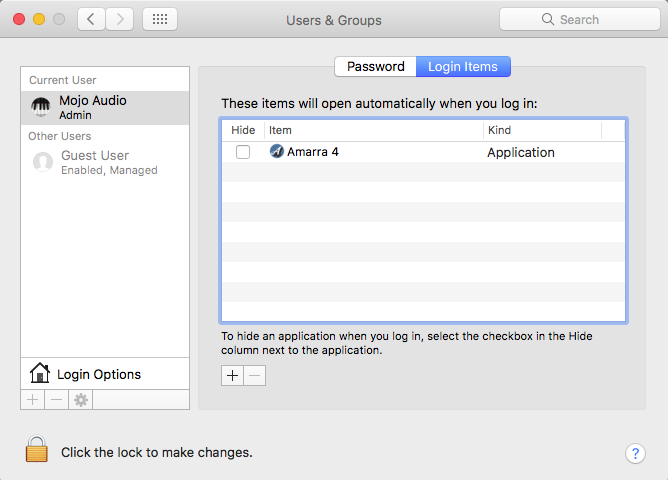
Disabling Login Items (Users & Groups Icon):
Click on the Login Items tab at the top.
You’ll see all the Applications you’ve set to automatically open at Login in the main window. Remove any optional automated Apps, such as iTunes Helper. The Apps you intentionally set to open at login should remain visible in this window.
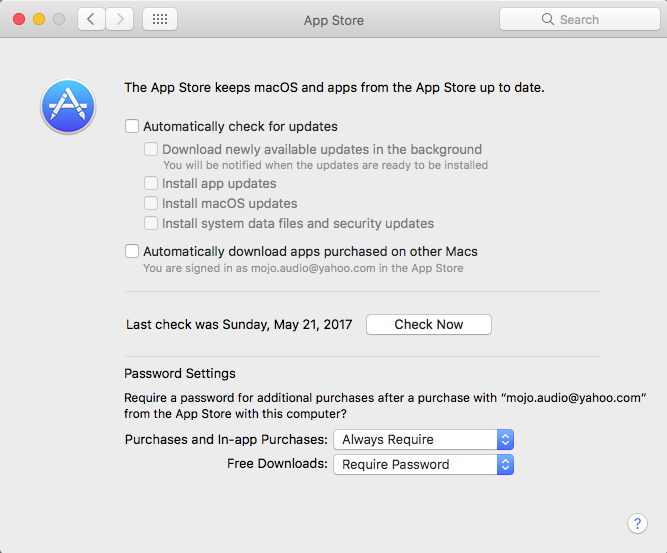
Disabling Automatic Software Update (App Store Icon):
Uncheck the Automatically check for updates box.
I cannot recommend more strongly that before updating OS X or any software you always make and test a backup.
Often updates have bugs, conflicts with drivers, or conflicts with software. Having a cloned bootable backup will allow you to quickly and easily return to your former working system. Love that Carbon Copy Cloner.
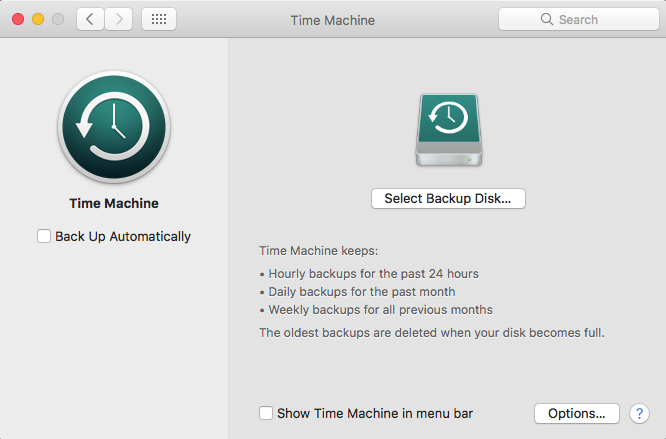
Disabling the Time Machine automatic backup (Time Machine Icon):
Uncheck box in newer versions of OS X or make sure the slide selector is switched off in older versions of OS X.
Warning! Your drives will inevitably fail: back up often. Using a cloned bootable backup will save you a significant amount of time when you have to reinstall your boot drive. Note that restoring Time Machine backups after a buggy update will not always completely revert the update. That is why I strongly recommend using a cloned bootable backup.
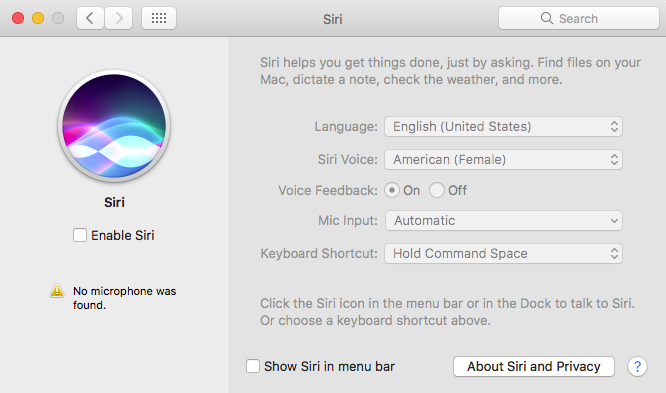
Disabling the Siri (Siri Icon):
Make sure there is no check in the Enable Siri box and that the rest of the window is dimmed.
Note: the following optimizations are not found in icons in the System Preferences window:
Disabling Widgets:
Click on the Widgets toggle in the upper right corner of your monitor.
Uncheck, deactivate, and remove as many items as possible from both the Today and the Notifications panels.
Speed up Finder window generation:
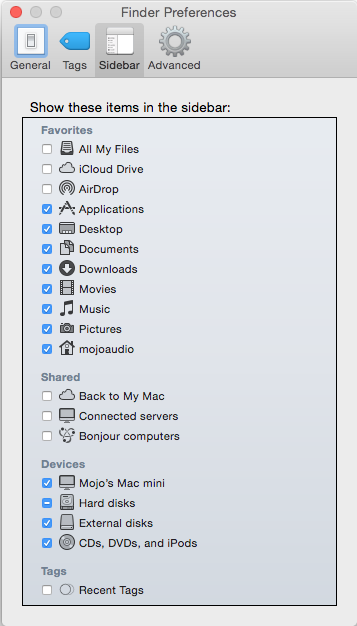
Finder > Preferences
Set the Finder windows to show the place(s) you go to most often. This could be Desktop, Documents, Music, Applications, etc.
You can control several other features in Finder Preferences by checking or unchecking features in other tabs.
Repairing disk permissions:
For optimal performance, “Repair Disk Permissions” after you do OS X updates, Application updates, or transfer large quantities of data. This is a good habit to get into. In versions of OS X Yosemite 10.10 or earlier, you can find Repair Disk Permissions in your Disk Utility Application. You can not do this in 10.11 El Capitan or 10.12 Sierra.
Launchpad > Other Folder > Disk Utility Application
Or
Finder > Applications > Other Folder > Disk Utility Application
Note: you can drag/drop or copy/paste the Disk Utility App from the Other folder to the main Applications folder for easier access in the future.
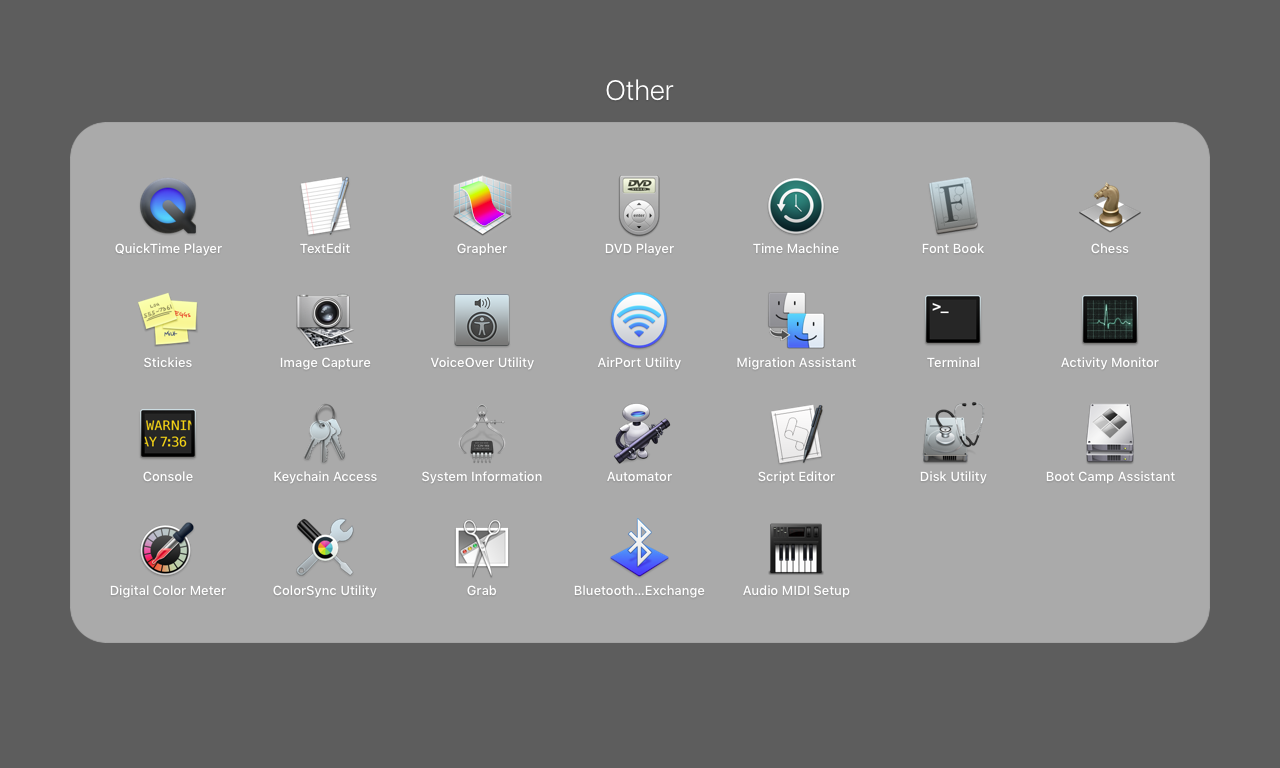
Use the Escape key on your keyboard to return from the Other folder to your main Applications.
To Repair Disk Permissions, simply highlight the disk you want to repair. Then press the "Repair Disk Permissions" button located center bottom of the Disk Utility window.
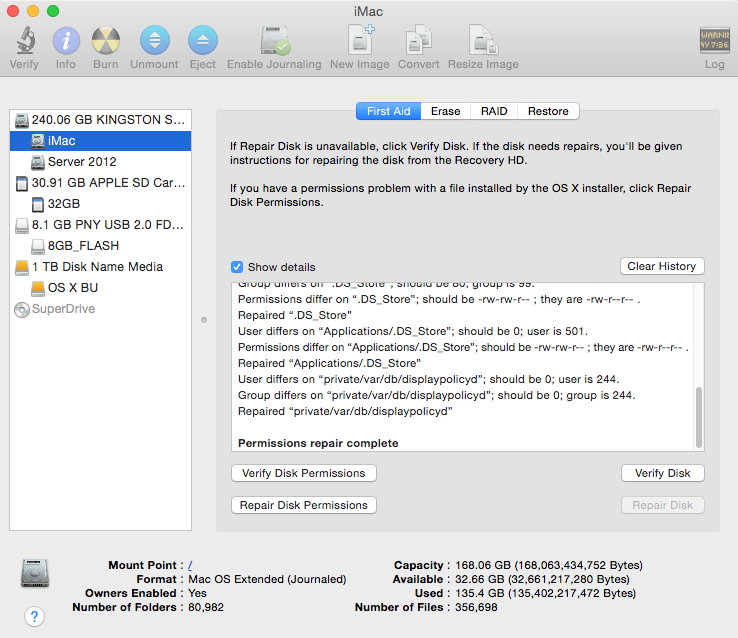
When repairing disk permissions is done, you will see Permissions repair complete at the bottom of the “Show details” window.
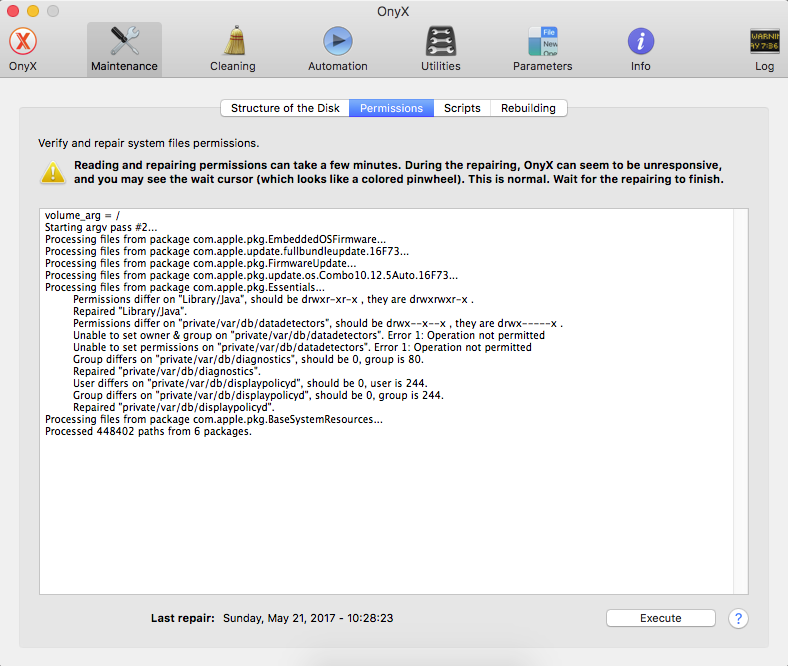
For OS X 10.11 El Capitan or 10.12 Sierra Repairing Disk Permissions is done automatically when you do Updates. Despite this new feature, many people prefer to do it manually. You can Repair Disk Permissions using a 3rd party optimization software, such as OnyX.
OnyX is FREE. Make sure to download the correct version of Onyx that is compatible with your version of OS X. Follow the instructions. There are many maintenance Apps in OnyX that I highly recommend for any Mac user.
Disable the automatic journaling feature:
Launchpad > Other Folder > Disk Utility Application
Or
Finder > Applications > Other Folder > Disk Utility Application
Individually select any drive on the list. Hold down the Option button on your keyboard and click on the File drop-down menu. Slide down the File dropdown menu and select Disable Journaling.
Repeat this for all drives.
Note: this does not work in newer versions of OS X, such as 10.11 El Capitan or 10.12 Sierra.
Disable unused wireless control interfaces:
For optimal performance disable all wireless control interfaces and do the following:
- Connect to the internet via Ethernet cable on a LAN.
- Control your computer using a wireless USB keyboard and mouse.
- Use cables vs. Bluetooth or WiFi to transfer data between computers and devices.
Let’s start by looking at what works with what so you’ll have a better idea of which wireless interfaces you’ll want to turn off.
Control devices associated with wireless interfaces:
- Modern Apple keyboard and mouse = Bluetooth
- Vintage Apple keyboard and mouse = USB (available on eBay)
- Most keyboards and mice = USB (wired or wireless)
- Apple and aftermarket remote controls = Infrared
- iOS and mobile device remote control = Bluetooth and/or WiFi
Warning! Turning off wireless interfaces can disable control devices, such as your Apple Bluetooth keyboard, mouse, or pad.
I always recommend having a USB keyboard and mouse to use for setup and troubleshooting. Wired tend to be foolproof, but wireless USB is fairly safe. Another good reason to use wireless USB devices is that they have relatively low noise compared to the integrated WiFi or Bluetooth. This is because they have external receivers that are better shielded from the computer’s internal circuitry. They also don’t require any additional system resources.
Note: Macs Mojo Audio optimizes will arrive with Infrared turned off and Bluetooth and WiFi turned on. After initial setup is complete it is recommended to connect to wireless and internet using the Ethernet port and to turn off Bluetooth and WiFi.
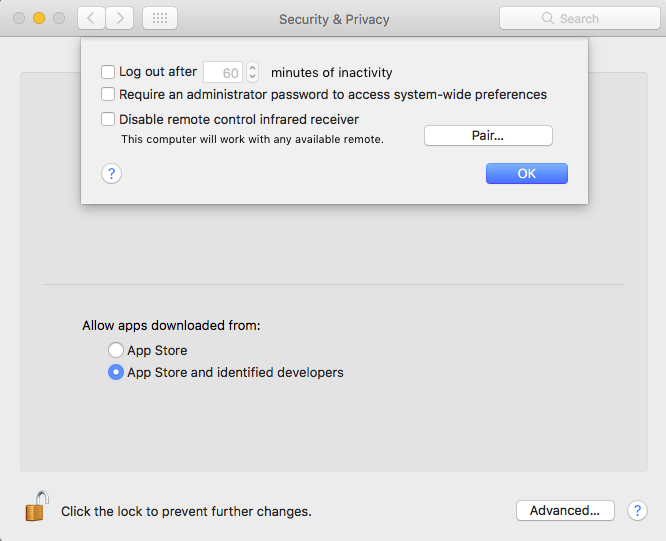
Turning on/off the infrared:
> System Preferences > Security & Privacy.
Click on the Advanced button.
Check the box next to Disable remote control infrared receiver.
Turning on/off the WiFi control interface:
> System Preferences > Network.
Click on and highlight WiFi in the left column and click on the Turn WiFi Off button.
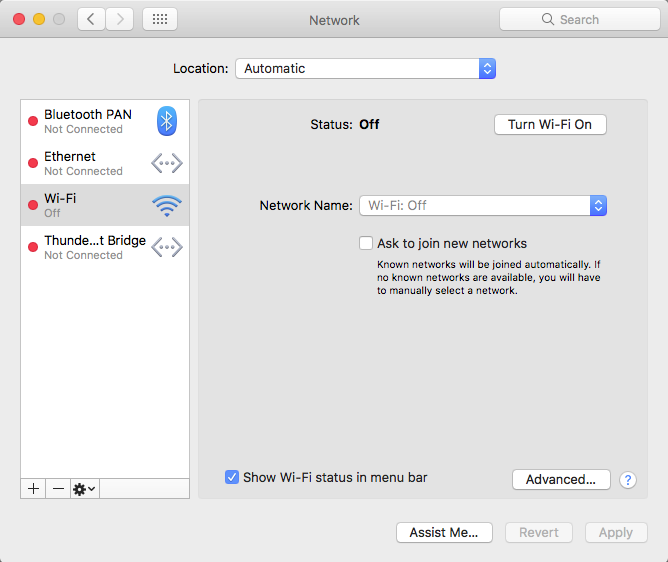
Note: The color of the dot on the left of the networking interface goes from green to red when an interface is turned off and returns to green when turned back on. Note that if there is a problem with a device you have turned on the dot will be yellow instead of green.
Turning on/off the Bluetooth:
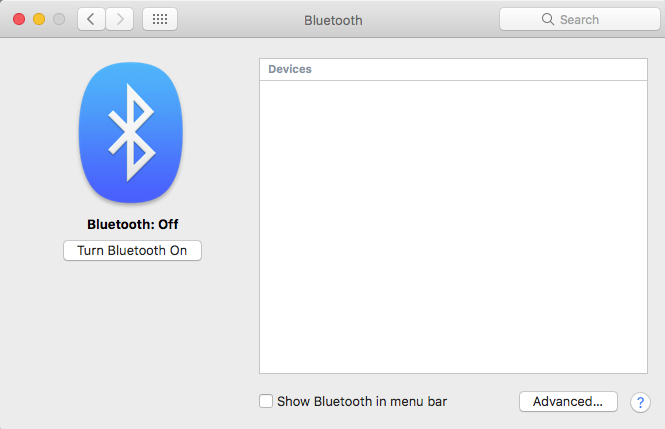
> System Preferences > Bluetooth.
Click on the Bluetooth status button. Note the status changes.
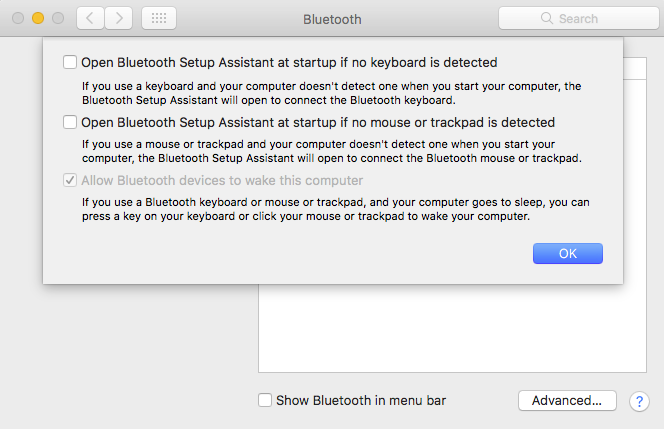
Click on the Advanced button and additional Bluetooth options appear.
Check or uncheck the options you want. Unchecking all is recommended.
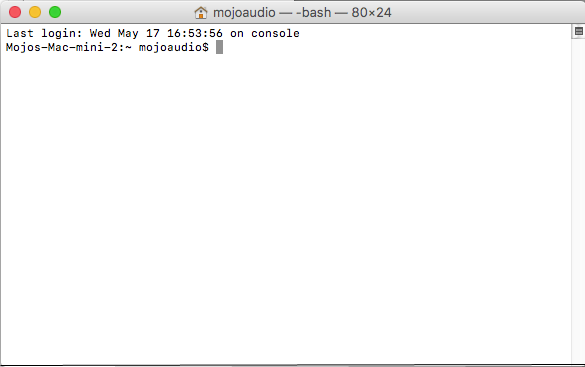
Deactivate processes using Terminal:
The Terminal application is a text-driven command-line interface that allows you to communicate directly with the Unix-based operating system at the core of OS X. Unix is the lowest possible level of human interface above machine language, giving the most streamlined and direct control over OS X.
Warning: incorrectly entering code in the Terminal Application can permanently disable your computer.
Launchpad > Other Folder >Terminal
Or
Finder > Applications > Other Folder >Terminal
Now you are ready to enter commands into the command-line. To minimize potential errors, I recommend you copy the commands from this blog and paste them into the Terminal’s command-line.
Remove Mission Control (copy/paste one at a time and hit the Enter key after each one):
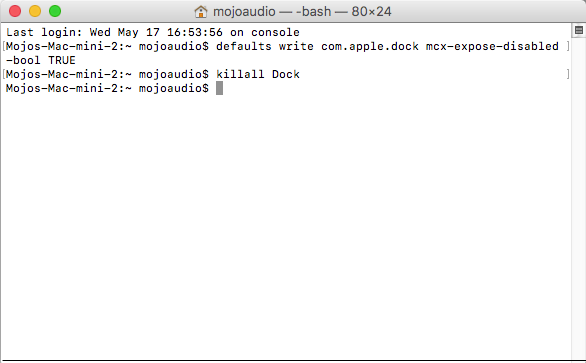
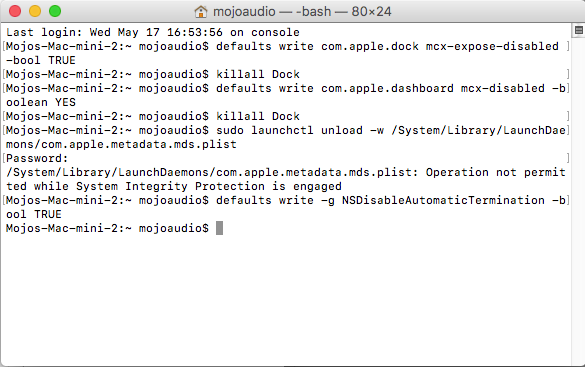
defaults write com.apple.dock mcx-expose-disabled -bool TRUE [Enter]
killall Dock [Enter]
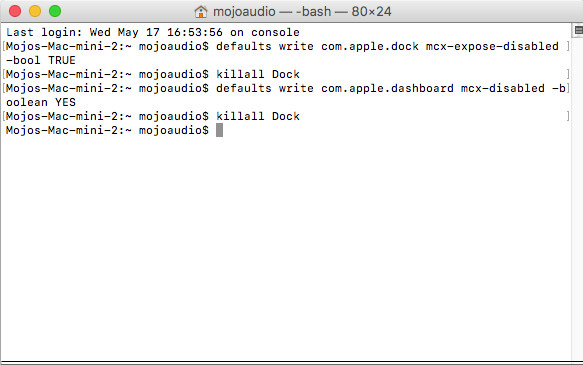
Remove Dashboard (copy/paste one at a time and hit the Enter key after each one):
defaults write com.apple.dashboard mcx-disabled -boolean YES [Enter]
killall Dock [Enter]
Remove Spotlight (Enter the following line and press Enter):
sudo launchctl unload -w /System/Library/LaunchDaemons/com.apple.metadata.mds.plist [Enter]
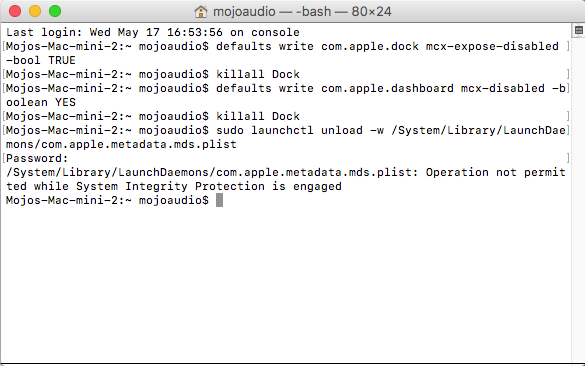
In order for the following command to take effect you’ll be required to enter your administrative password and hit the Enter key.
Note: The administrative password for Mojo Audio optimized systems is: “Mojo.”
Remove Automatic Termination:
defaults write -g NSDisableAutomaticTermination -bool TRUE [Enter]
Resetting OS X to quit Finder (copy/paste one at a time and hit the Enter key after each one):
defaults write com.apple.finder QuitMenuItem 1 [Enter]
killall Finder [Enter]
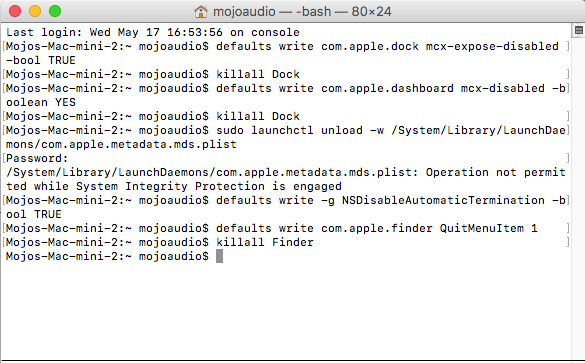
Finder is the main organizer in OS X. Unlike most applications which you can quit or Force Quit, the default settings in OS X will allow you to relaunch but not to actually quit Finder.
Important!
To maintain optimal performance, each time you reboot your computer, and each time you use Finder, you will need to follow the instructions below to manually quit the Finder Application.
OS X requires at least one Application is open, so you’ll need to open your player software before you can quit Finder.
Click on the Finder icon in the dock.
Select the Finder column in the dropdown menu next to the Apple Menu in the upper left corner of your screen.
Finder > Quit Finder
Slide down to the bottom row and select Quit Finder.
You’ll know Finder is not running if the dot under the Finder icon in the dock is gone.
Reactivate processes using Terminal:
Reactivate Dashboard (copy/paste one at a time and hit the Enter key after each one):
defaults write com.apple.dashboard mcx-disabled -boolean NO [Enter]
killall Dock [Enter]
Reactivate Mission Control (copy/paste one at a time and hit the Enter key after each one):
defaults write com.apple.dock mcx-expose-disabled -bool FALSE [Enter}
killall Dock [Enter]
Reactivate Spotlight:
sudo launchctl load -w /System/Library/LaunchDaemons/com.apple.metadata.mds.plist [Enter]
In order for the following command to take effect you will be required to enter your administrative password and then hit the Enter key.
Reactivate Automatic Termination:
defaults write -g NSDisableAutomaticTermination -bool FALSE [Enter]
Reactivate Finder (copy/paste one at a time and hit the Enter key after each one):
defaults write com.apple.finder QuitMenuItem 0 [Enter]
killall Finder [Enter]
IMPORTANT!
Perform periodic maintenance:
To maintain the highest level of performance you must periodically do a few manual tasks:
- Repair Disk Permissions after updating OS X, ripping CDs, or downloading files.
- Turn off the Finder application every time you open Finder or reboot.
- Close all applications other than your player or primary software.
- Clone or back up your boot drive and library drive as they change.
- Update OS X only as needed - if it's not broke, don’t fix it.
Enjoy!
Benjamin Zwickel
Owner, Mojo Audio
